Behind the Scenes: How IT Used Virtual Reality to Change the Way We Recruit at BetterCloud
June 1, 2016
10 minute read
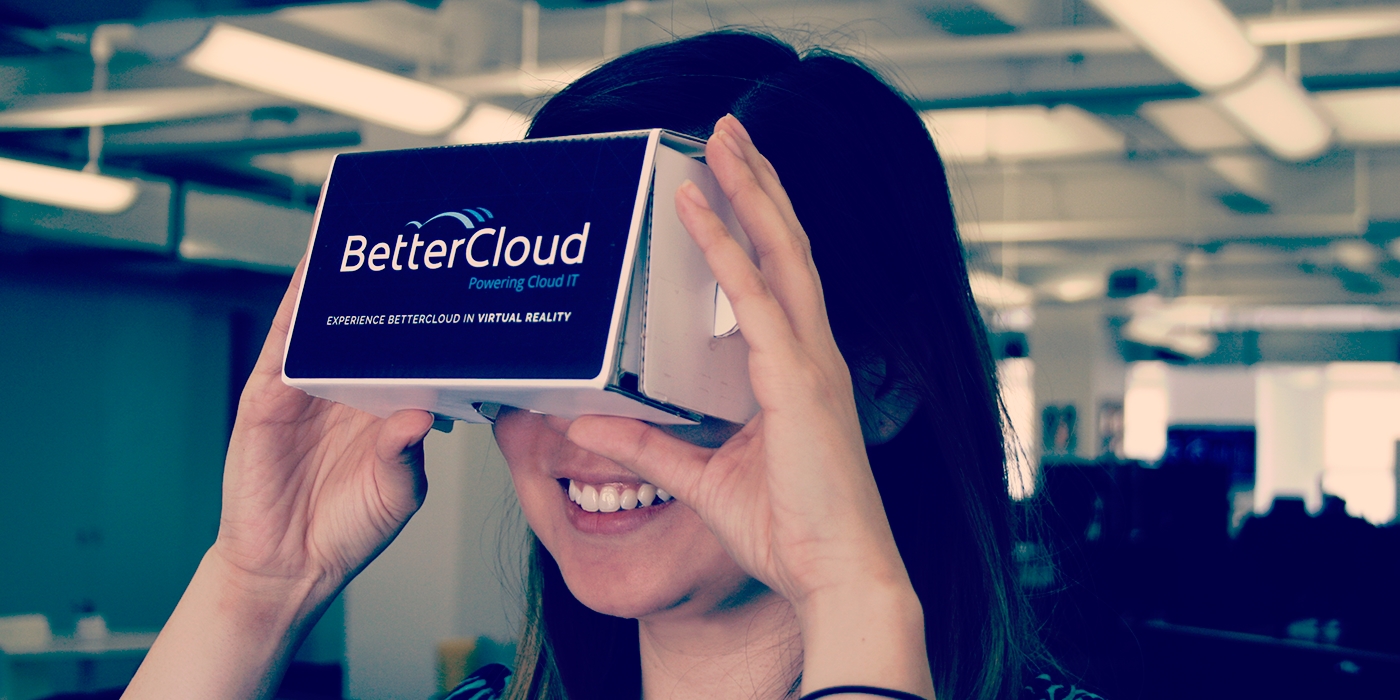
Technology has evolved to the point where we can use virtual reality to do almost anything: skydive, scuba dive, even swap genders.
But the possibilities for using VR don’t end there. Here at BetterCloud, we’re using it as a recruiting tool to attract great people and disrupt traditional recruiting methods.
Hiring in the tech space is growing increasingly competitive. To differentiate ourselves, our IT team worked with the HR, recruiting, and tech support teams to produce short recruiting videos with 360 footage.
The result? A hiring process that’s uniquely immersive.
Candidates can take a full 360-degree “look” around the office space, catch a glimpse into our culture (dartboards and all), and get a day-in-the-life look at the role—e.g., see where they’d sit, what they’d do day-to-day, and who their team members are.
When you put the Google Cardboard-esque VR headset on and look around, the video moves with you. You feel like you’re actually in the office, because you get a sense of depth in every direction. Prospective hires can (literally) envision what it’d be like to work at BetterCloud.
Check out the BetterCloud VR app on iOS and Android.
 Using Virtual Reality to Show, Well, Reality
“The whole point is you should be able to throw the Cardboard on, fire up video of any of the job descriptions, and within 60 seconds, have a good idea of who the people are that would be sitting next to you and what your office environment would be like. We can never communicate that through words,” says Tim Burke, Director of IT at BetterCloud.
“It’s about capturing those moments where someone’s shooting a Nerf gun, or someone cracks a horrible joke and the whole side of the office laughs. All of our unscripted, random moments are what we’re trying to show,” he says. “We don’t need to fake anything. I think our culture, our people, our office, our technology—all of it speaks for itself.”
Given how immature the VR market is, we experienced many technical headaches and teething problems along the way. Here’s how IT created the 360 videos from start to finish, and here are all the technical things we wish we had known earlier—so you don’t have to repeat the same mistakes we did.
We’re hiring! Know somebody who’d be great in sales or engineering? Refer a sales or engineering candidate and get $500 if they’re hired. Check out all our job openings here.
How It All Started: The Lightbulb Moment
The idea for using VR came from Mike Stone, BetterCloud’s Director of Technical Support. He noticed that a lot of the content on tech blogs was about VR, and, on a whim, bought a $20 plastic VR viewer.
“I was messing around with it one day, and I thought, ‘I bet we could do this, if we just figured out how to get a camera,’” said Stone.
At first, the original idea was to film 360 footage of the company kickoff earlier this year in Atlanta. “Then that turned into, ‘Let’s now make video job descriptions, so you can get the full virtual experience,’” he said.
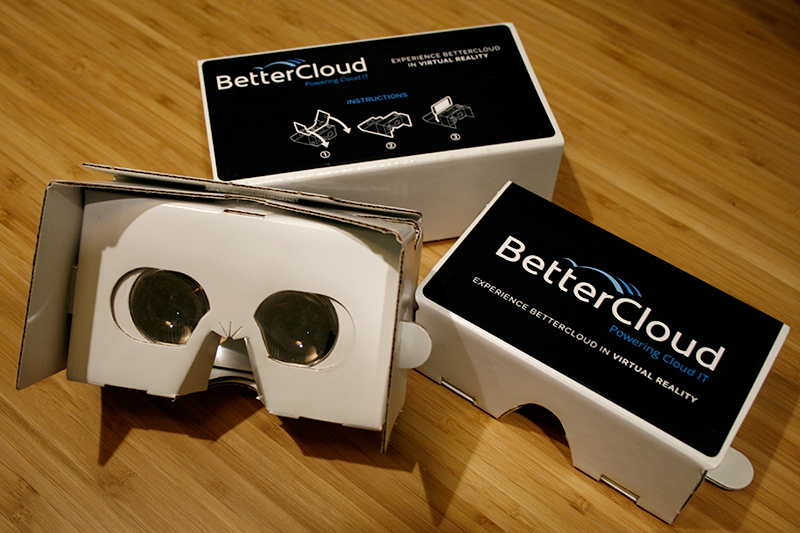
As a first step, Stone researched custom VR viewers and ordered 200 customized BetterCloud-branded VR viewers (similar to Google Cardboard) that he could mail to prospective candidates.
Next came the tough part: the 360 footage.
The End to End Workflow: All the Steps
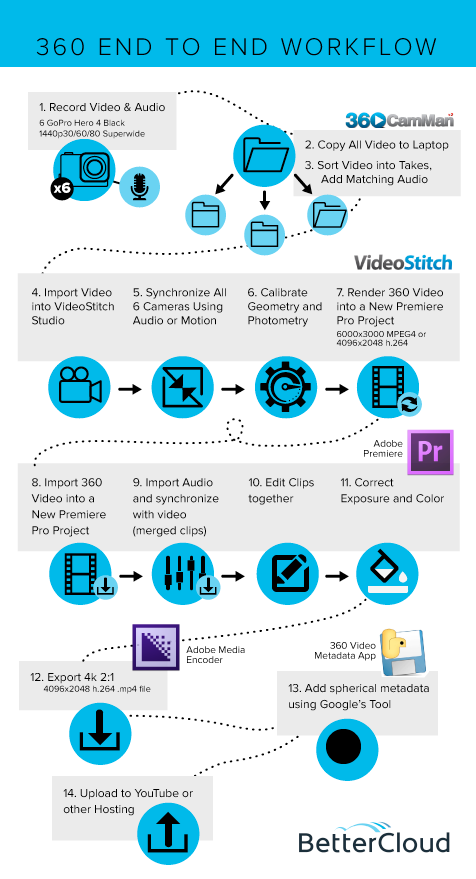
Here are the steps listed below, with some additional details and useful tips for the more challenging ones:
Step 1: Record Video & Audio
First, to record the video and audio, you need the right equipment for your project. Sure, you can look into 16-camera rigs like Google Jump. But for the average consumer, $15,000 might be a bit steep.
After doing some research, Stone and Burke took a few trips to B&H and spent approximately $8,000, which included:
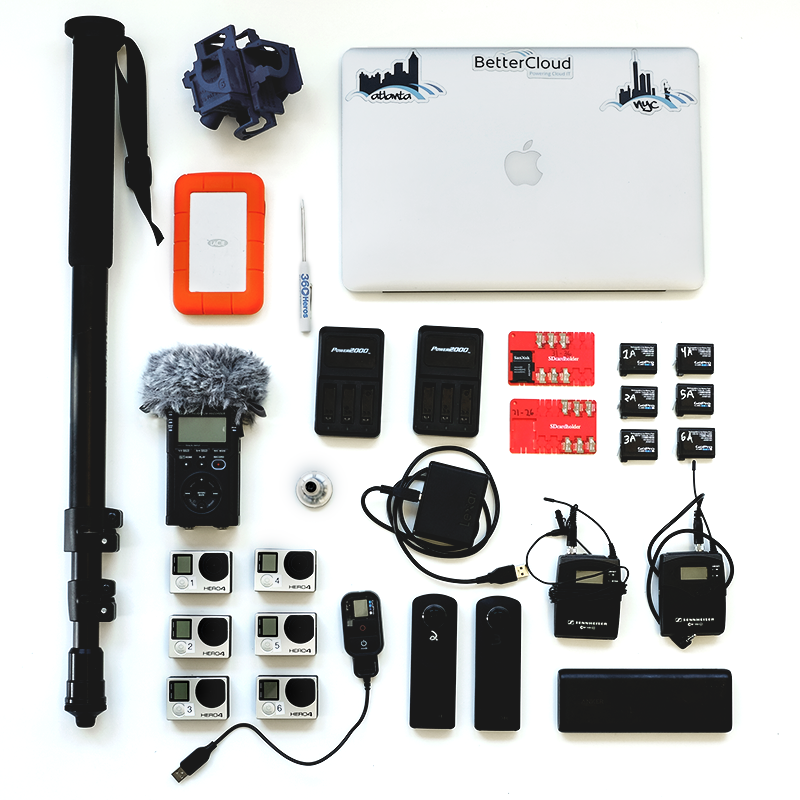
Equipment:
- Six GoPro cameras
- 360Heros camera rig
- Three Ricoh Theta S cameras
- Six SD cards
- Six extra batteries
- Tripods
- Waterproof Pelican carrying case (to keep everything safe when traveling)
Software:
- 360Heros – to help manage video files
- VideoStitch Studio (included as a bundle with the mount) – to stitch footage together
Stone and Burke compared test footage and technical features between their new GoPros and Ricoh Theta S cameras. They felt that the GoPros—with better lenses, resolution, frame rate, and compression—produced higher-quality footage, so they ultimately chose to use the GoPros.
When Burke shot the company kickoff in Atlanta, he quickly discovered that when shooting 360 footage, there’s a lot that needs to be set up properly. If one camera malfunctions, the whole process falls apart.
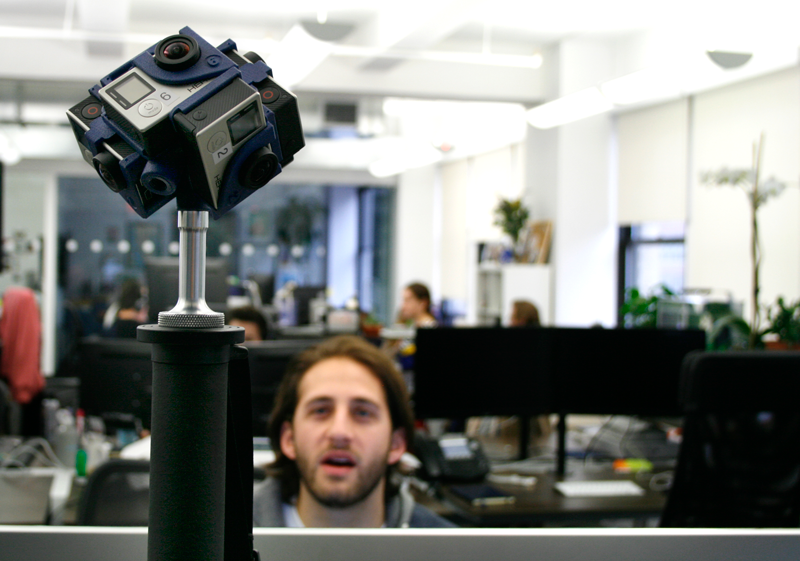
You have to make sure all cameras are:
- On and running
- Connected to the remote
- In video mode
- Starting at the right time
- Have identical settings (e.g., resolution, white balance, frames per second). If you change the setting on one camera, you have to change all six
And:
- That hitting “record” on the remote actually fires all six cameras
- Batteries are fully charged
- SD cards are formatted, numbered, labeled, and completely empty
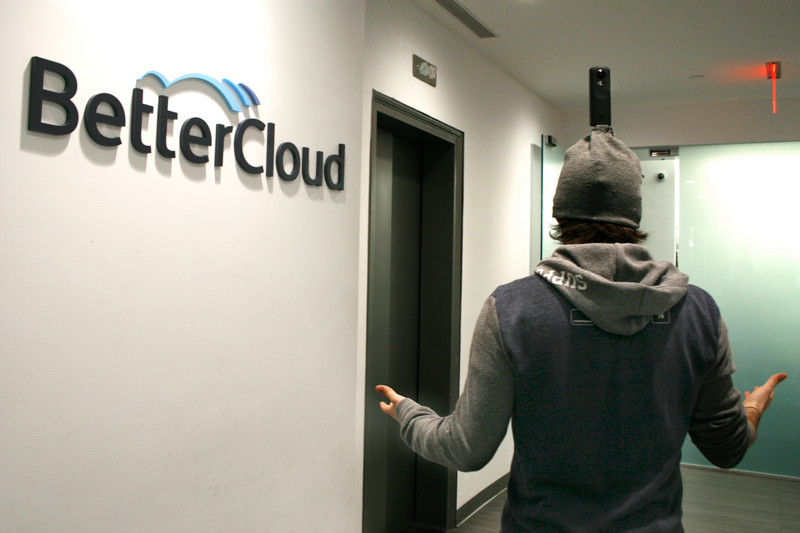
When shooting the recruiting video, Stone mounted the six GoPros on his desk and filmed a few stationary takes. Mounting the camera for the walk-through tours of the office took some cobbled-together creativity and MacGyvering (like fashioning a mount out of the beanie on his head).

Steps 2-3: Copy All Video to Laptop and Sort Video into Takes/Add Matching Audio
After you record your footage, you have to empty your SD cards and copy all the video over. Organization is critical to the success of your project.
“You name the SD cards 1-6 and when you insert the SD card, [the 360Heros software] can tell that SD card 2 is from Camera 2, and it’ll put all the files from that in the Camera 2 folder,” Burke said. “You’ve got to keep everything organized. [Dump] those six video files shot at the same time, move onto the next six. Do those, move on to the next six,” says Burke. “It’s really intense.”
According to Burke, overall, the process generated about 100-220 GB an hour in just raw footage. At the two-day company kickoff, he says a terabyte and a half of footage was generated.
Step 4: Import Video into VideoStitch Studio
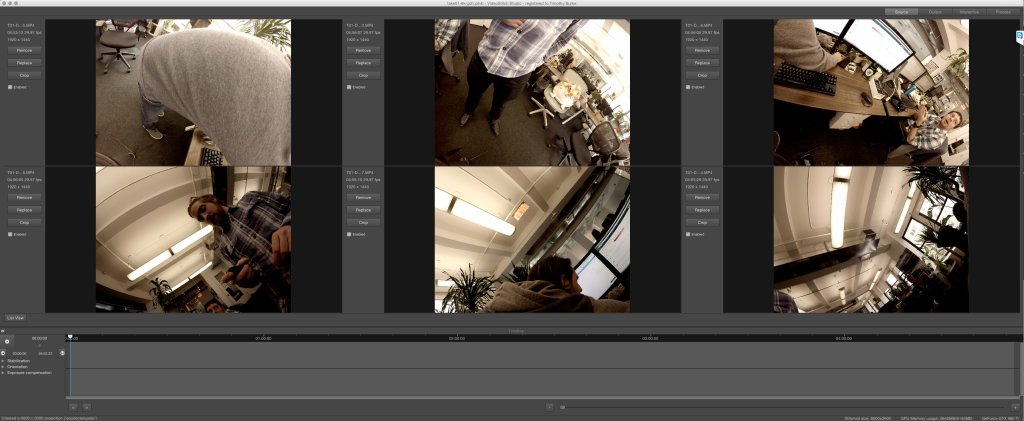
Next, you have to stitch all the videos together. VideoStitch Studio requires not only a very fast computer with lots of memory and a fast CPU, but it also needs a high-end graphics card to accelerate all the renders.
Burke bought a top-of-the-line graphics card from NVIDIA: the GeForce GTX 980 Ti (approximately $1,000) with six GB of video memory. You need a recent NVIDIA card that’s CUDA-compatible, he says, because the software uses the graphics card and the CPU to do the stitching.
Step 5: Synchronize All Six Cameras Using Audio or Motion
The software was supposed to automatically take care of this, but it always missed the right frame, says Burke. So he spent several tedious hours playing around with the footage, painstakingly moving it up or down one or two frames to sync the audio to the video.
Lesson learned for next time: Use a clapperboard to easily sync audio.
Step 6: Calibrate Geometry and Photometry
It was a lot of trial and error on the perspective calibration, says Burke.
The video is on a grid, and there’s a single line that goes through the middle (your “horizon” line). There’s no spatial metadata actually inserted in the video itself, so he had to drag the video around and level it until the “horizon” was actually in the middle, not at people’s feet or way up on the ceiling. This can be difficult because the footage looks “wobbly” and “curvy”—but if you don’t calibrate it correctly, your footage will end up crooked. If you can line up your horizon line with a straight line (e.g., a straight line on your wall), it’ll help make your footage nice and straight.
Step 7: Render 360 Video into a New Premiere Pro Project
Rendering time depends on your settings, but it’s about three times slower than real-time. So a three-minute clip took about nine minutes to render. This is an incredibly intensive task for your computer. “After 30 seconds, all the fans would spin up on the computer. It sounded like a jet taking off,” said Burke.
Steps 8-9: Import 360 Video into a New Premiere Pro Project, Import Audio and Synchronize with Video
Step 10: Edit Clips Together
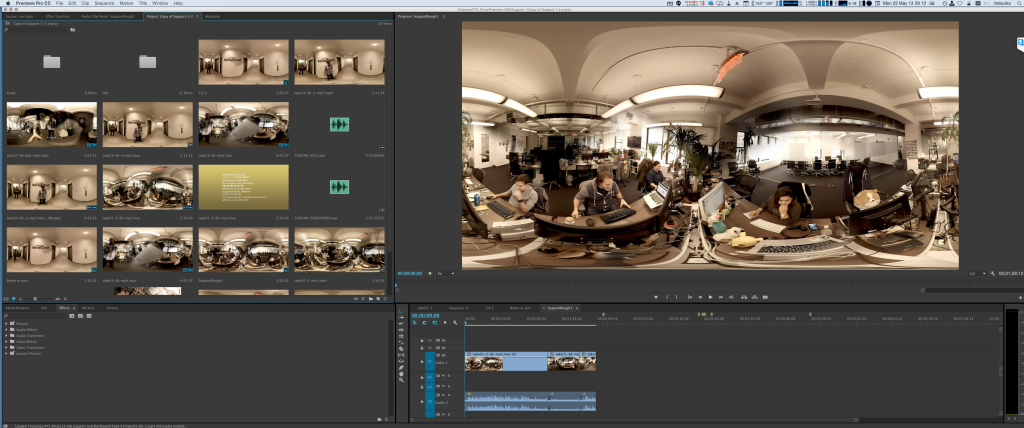
Remember that VR is still very much emerging, so temper expectations during the editing process. Flashy, quick cuts and pans can make viewers sick, so keep the edits simple. Basic transitions and no-frills editing will do the trick.
Steps 11-12: Correct Exposure and Color, Export 4K 2:1
Step 13: Add Spherical Metadata Using Google’s Tool
The last step is to attach spherical metadata into the file before you upload it. “Basically, you’re modifying this flat video file and telling YouTube that it’s a spherical 360 video and it needs to render as such,” says Burke. If you don’t do this, the video will come out in a distorted, flat format, and it won’t look right.
“For YouTube, you need to use a tool called 360 Metadata Injector, or there’s a Python script from Google that does the exact same thing,” says Burke.
For different platforms, you should use different settings. Burke rendered two different versions.
“The API and rendering support is a little bit stronger on the Android side for the Cardboard SDK, so I had to create the full res master [4K] for Android and then a half res 1080p file for iOS,” he says.
Creating Our Own BetterCloud App
Initially, the team was hoping that YouTube would serve up the videos via the native Cardboard app, so that anyone with a smartphone could view the video.
However, they soon discovered that while it works natively on Android, that wasn’t the case for iOS—the iOS YouTube app didn’t support 360 video at the time. To combat that problem, BetterCloud worked with Foundry45 to create a BetterCloud iOS app. Foundry45 turned the mobile project around in about two and a half weeks and added basic link tracking.
Check out the BetterCloud VR app on iOS and Android.
What We Wish We Had Known, and What You Can Learn From Our Technical Hiccups Along the Way
- Be prepared for LOTS of data. Burke says the sheer quantity of data that the cameras produced was staggering, so be prepared with sufficient storage. “Each one of the GoPros will generate about 30 GB an hour of video footage, so 30 GB × six cameras—that’s 180 GB per hour. Multiply that by eight hours, you’re almost at 1.5 TB, so you filled up a 2 TB hard drive with one data video,” he says. To put that into perspective, that’s equal to sending 57,600 Gmail attachments (at the maximum file limit).
- Use a stationary mount. Stone says one of the hardest parts was getting stable footage. When he tried strapping the camera in his backpack, it bumped around because he was walking. “If I turned at all, you get very motion sick watching it,” said Stone.
- Bring extra batteries. Even though the GoPros were supposed to last an hour and fifteen minutes on batteries, Burke discovered that one camera kept dying sooner. This was problematic because you need all six cameras running at once to put the video together. So even though you might have shot for 55 minutes, you might only end up with 35 minutes of usable video because one camera died early.
- RTFM. Initially, Burke spent hours trying to render the video. “The video just wouldn’t stitch together; none of the edges were lining up. For a while, I had that feeling in the pit of my stomach, like ‘Oh crap, I’m in over my head. I don’t know what I’m doing. We just spent $8,000 on all this and I’m going to have nothing to show for it.” He eventually read the manual and realized he just made a silly mistake. So save yourself some frustration and always RTFM.
- YouTube processing for 360 footage takes longer than usual—don’t freak out. Be patient and don’t assume your video is broken after you upload it to YouTube. Unlike 720p or 1080p video, which is ready to view in minutes, it can take 30-60 minutes before your video is in 360 format and ready to share on YouTube, says Burke.
Tips and Best Practices
Given what we learned, here are some general tips to make this a smoother process, if you’re interested in creating your own 360 footage:
- Do a lot of dry runs and testing. Cameras might not record. Settings might be wrong. In which case: your footage is worthless. “As an IT professional, my absolute worst fear is data loss. My worst nightmare is to say, ‘We lost this data’ or ‘This camera wasn’t shooting.’” Make sure you do a lot of testing and prep, so that everything is ready and you’re using people’s time efficiently.
- Always double check your gear. “When you’re using six cameras, you constantly need to make sure they’re all running,” says Stone. If one camera is down, then none of the footage is usable.
- Allot extra time to get ramped up. It took Burke about a month before he was truly comfortable with the entire process. “It was a longer learning period and longer ramp up than I expected,” he said. You also should allocate extra time for external dependencies (for instance, licensing issues with third-party software that may take a few days to resolve).
- Be prepared for trial and error, and have patience. The virtual reality market is still relatively immature, meaning there’s not a ton of documentation out there. The support content and community are scant, so there aren’t many places to look for help. “I had to figure out a lot of it on my own. This is so new, no one has the answer,” says Burke. “The biggest lesson learned is if you want to be an early adopter, then suck it up. It’s going to break, and you’re going to get angry, frustrated, and confused. Overall though, it’s been a really awesome, really fun project.”
Check out the BetterCloud VR app on iOS and Android.
Looking to join a company where you get ownership to tackle big problems and work with great people and cool technology? We’re hiring in New York City and Atlanta! Check out our job listings here.
Know somebody who’d be great in sales or engineering? Refer a sales or engineering candidate and get $500 if they’re hired.


 Using Virtual Reality to Show, Well, Reality