How to Create an Email Signature for Your Company
June 12, 2013
5 minute read

Last week we updated our email signatures. Sure, they’re just a few lines at the bottom of an email, but a great signature – or a horrible one – can truly impact how you present yourself within and outside of your company.
Why Do You Need An Email Signature?
An email signature adds context to your emails, especially if you’re interacting with someone for the very first time. Or perhaps you’re trying to set up a meeting. By putting your office address and phone number or even a link to appointment slots in your signature, you can avoid the back and forth of scheduling.
The Basics
So what makes a good email signature? Well first and foremost, your signature should look great. A poorly designed signature can seem unprofessional. It’s not hard to create a nice looking signature, but people seldom take the time to do so. Second, your signature should be useful. You could have the best looking signature out there, but if it doesn’t include information like your work and / or mobile numbers, your office address and your email, it’s really not serving any purpose. And lastly, signatures need to be consistent. Whether this is a job left to the Marketing department or an IT admin, signatures should be standardized across your entire company.
Design
You want your email signature to look good, right? While it may just be a few lines tacked to the end of an email, your signature goes on every single email you send. Think of it as an actionable, digital business card – and we’ve all seen horrible business cards. There are a few important guidelines to follow when you’re creating a signature:
- Stick to a simple color palette – Play off of the colors in your company logo. Choose one accent color to go along with one or two neutrals.
- Keep fonts and sizes consistent – Choose a font you like and stick to it. Your logo probably already has one font in it, so make sure you only use one or two fonts – perhaps one font for a headline item like your name and another for contact information. And make sure the font size complements the body of your email – anything larger than 12 pt. is too large.
- Make it brief – Your signature already follows an email, so make it short and to the point. Only include vital information.
More than Just a Pretty Face
Hopefully we all know by now that an email signature should include your email and work and / or mobile numbers, but there’s potential to add other helpful information that might not be on your radar.
Tracked Links
Does your company have some recent big news? Do you want to promote an upcoming event or product? While adding a link to your signature will serve this purpose, there’s no way to know whether or not people are actually clicking the link unless you track it.
If you use Google Analytics, creating a tracked link is easy. Visit the URL builder, enter the appropriate information: Source: email, Type: click, Campaign: Signature, and then hyperlink the anchor text in your signature with the tracked link.
To view stats for your tracked link, log into Google Analytics, find the URL and then view Traffic Sources > Campaign.
Let’s Talk Logistics
Once your signature is designed (tracked links included), there’s the matter of actually applying your signature.
Individual Application
If you’re acting independently, updating your signature can be done in Gmail settings. From your inbox, select the gear icon at the top right hand side, then select Settings. Under the General tab, scroll down until you find Signature. Deselect the radio button labeled “No Signature,” then copy and paste your new signature design into the box.
Once you’ve formatted your new signature, click “Save Changes” at the bottom of the page and refresh your inbox.
Email Signature Standardization
If you’d like to create standardized signatures for your entire company or for a certain department within your organization, you’ll need the help of a third-party tool like BetterCloud.
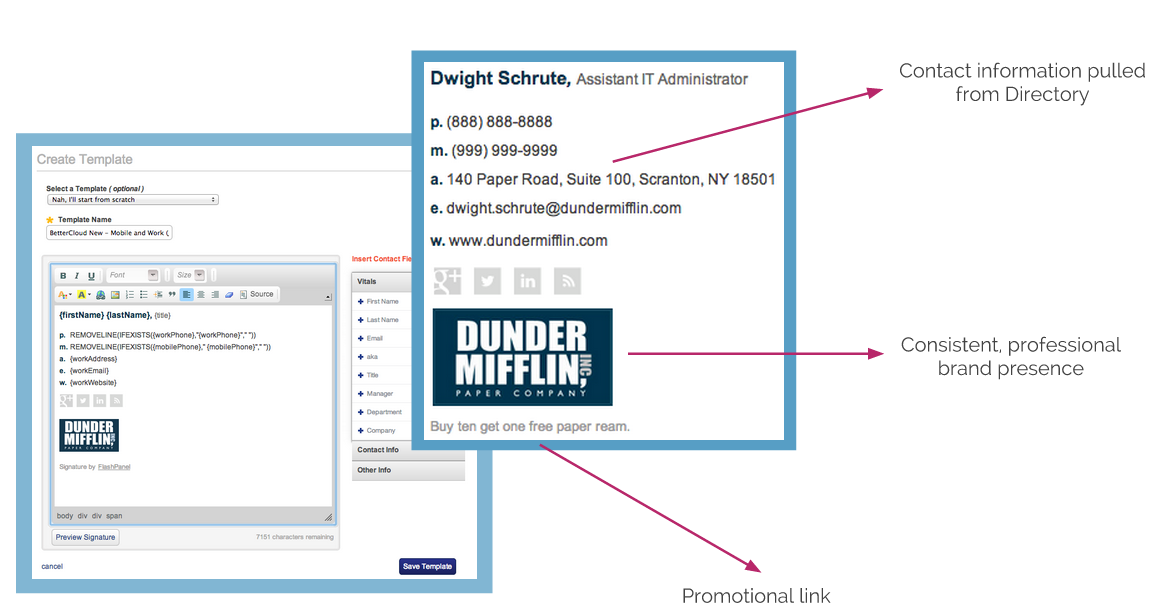
Using BetterCloud’s Google Apps Email Signature tool, you can create a signature template, which can be applied to individuals, OUs or your entire user base.
If you don’t already have BetterCloud installed, you can find it in the Google Apps Marketplace.
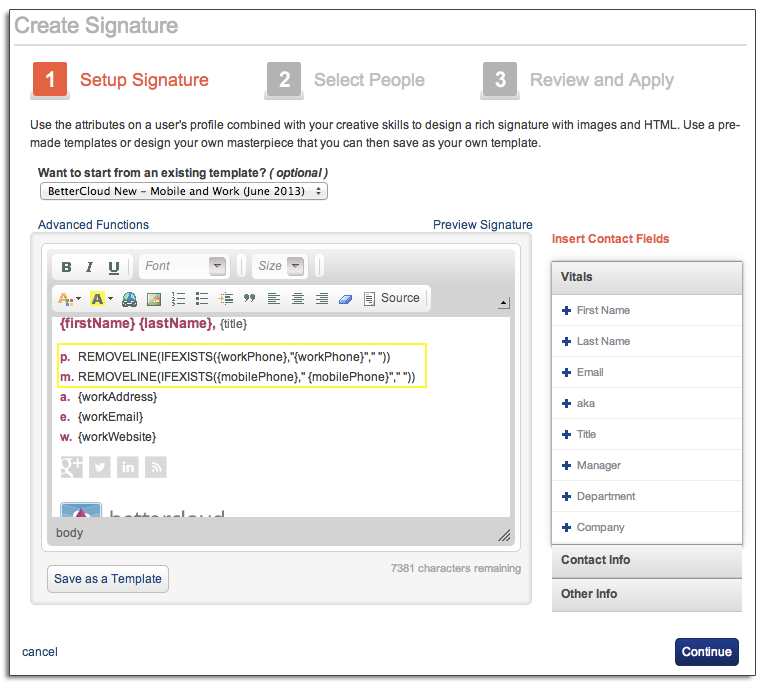
To get started creating a signature template in BetterCloud, go to the Tools tab at the top of the application, then select Email Tools > Signatures then Create Signature. Once here, you can either choose one of the pre created signatures like “Classic” or “Modern” or start from scratch.
If you choose to start from scratch, you can either insert the signature in the visual editor, or you can use the source editor.
Note that if you’re including an image like a logo or social icons, you need to host these images somewhere publicly like on imgur.com.
In the above image, notice the words “IF EXISTS.” This condition was inserted so certain information is pulled in only for the employees that have that information listed in their user profile.
For instance, say I have my work phone number, but not my mobile phone number in my user profile. By using the “IF EXISTS” function, we can ensure that my signature will not show a blank space next to ‘m.” (mobile phone).
To learn more about advanced signature functions in BetterCloud, check out this Knowledgebase article.
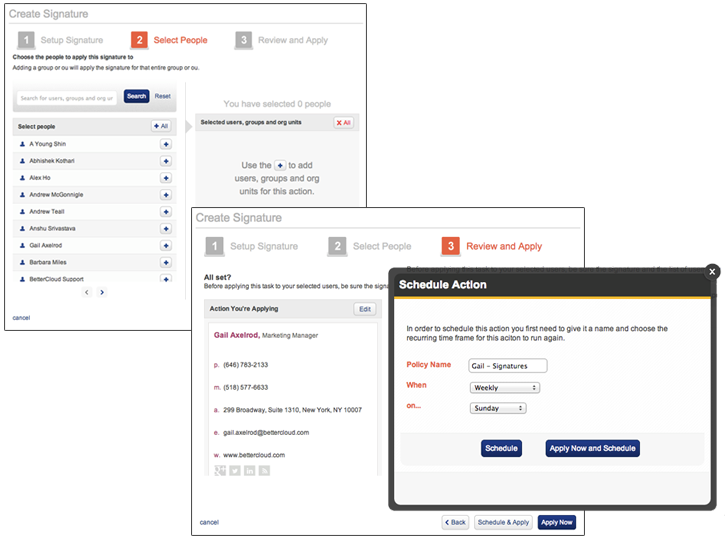
After properly formatting your signature, select the continue button and then choose the users to whom you wish to apply the signature. Click continue once more to review and apply the signature. In this third step, you can either apply the signature immediately, or you can schedule and apply. Scheduling the signature creates a policy – you can allow BetterCloud to push out the signature daily, weekly, monthly and so forth to override any changes users make individually from within Gmail settings.
Finally, inform your users. Make sure employees know that they have just received a new email signature and they should not make any changes to it on their own. Plus, if you’ve decided to schedule the signature, any changes will be overridden.
Delegating Signature Management
If you’re the super administrator on your domain and you’d like to delegate the ability to create and apply signatures in BetterCloud to someone in your Marketing Department, you’ll need to create an access role.
To do so, select Settings at the top of BetterCloud and then choose Access Control and Create. Expand the Directory tab and then select Email Signatures under Email/Calendar tools. You’ll also likely need to grant edit access to the Google Apps Directory should the delegated manager need to update contact information in an employee’s user profile.
Once you’ve selected the appropriate permissions, scroll to the bottom of the page and select Save & Update Users then Add a user now. Enter the desired user’s name and then hit Save & Apply.


